

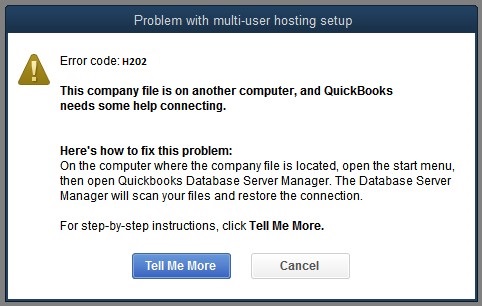
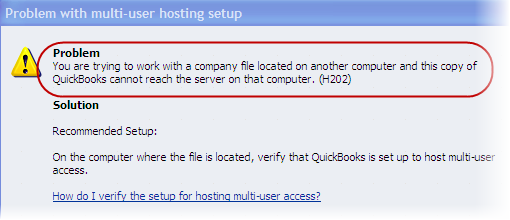
QuickBooks error H202 is a frequently encountered issue from the H series errors, often arising when users attempt to switch to multi-user mode. Typically, it accompanies a warning message stating: "This company file is on another computer, and QuickBooks needs some help connecting." This hiccup occurs when QuickBooks struggles to access a company file stored on a different system, manifesting as a blockage in the multi-user connection to the server. Various factors contribute to this error, yet straightforward steps can resolve it effectively. Understanding this error in detail, here's a comprehensive guide outlining QuickBooks error H202, accompanied by actionable steps to rectify it.
What is the QuickBooks error H202?
As mentioned earlier, QuickBooks error H202 is a multi-user mode error that falls under the H series category. You can usually encounter such an error when opening a company file saved on the server or enabling multi-user mode on any system in the network. As this error is associated with the company file itself, it becomes essential to address the issue as soon as possible, in order to avoid any sort of further technical issue.
What leads to QuickBooks error H202?
The occurrence of QB error Code H202 on Windows OS is commonly influenced by various factors:
-
Network or connection issues blocking multi-user communication with the server.
-
Misconfiguration in QuickBooks hosting settings causing the error.
-
Damage or corruption in the company file or support file leading to the issue.
-
Inactivity or disabling of QuickBooks services on the server.
-
Firewall-related problems causing QuickBooks error code H202 in Multi-User mode.
-
Incorrect setup of DNS settings resulting in the display of error code H202.
-
Unresponsiveness of QuickBooks Database Server Manager.
-
Problems with critical QuickBooks services (e.g., QuickBooksDBXX and QBCFMonitor) running in the background, causing this error.
Methods to Resolve QuickBooks Error H202
There are a bunch of measures that can be taken to successfully eliminate the QuickBooks error H202. Let us evaluate each of the methods one by one and understand the error better:
Method 1: Setting folder permissions for QuickBooks
In many scenarios, such an error gets triggered when there aren’t enough folder permissions for the file to be accessed by the software in multi user mode. In such scenarios, one needs to set the folder permissions.
-
You can navigate to the file explorer and move to each folder listed below one by one:
-
C:\Program Data\Intuit\Entitlement Client\v8
-
C:\Program Data\Intuit\Entitlement Client\v6.0
-
C:\Program Data\Intuit\Entitlement Client\v5
-
C:\Program Data\Intuit\Entitlement Client\v3
-
C:\Program Data\Intuit\Entitlement Client
-
C:\Program Data\Intuit\QuickBooks Enterprise Solutions X.0 (X = version) or C:\Program Data\Intuit\QuickBooks 20XX (XX = year)
-
C:\Program Data\COMMON FILES\INTUIT
-
C:\Program Data\COMMON FILES\INTUIT\QUICKBOOKS
-
C:\Users\Public\Public Documents\Intuit\QuickBooks\FAMXX (XX = year)
-
C:\Users\Public\Public Documents\Intuit\QuickBooks\Company Files
-
C:\Users\Public\Public Documents\Intuit\QuickBooks\Sample Company Files\QuickBooks Enterprise Solutions X.0 (X = version) or C:\Users\Public\Public Documents\Intuit\QuickBooks\Sample Company Files\QuickBooks 20XX (XX = year)
Furthermore, you might not have all these folders, as each folder listed is specific to certain QuickBooks versions
-
You will now have to head to the properties of these folders.
-
And navigate to the security tab and select everyone.
-
Followed by, in the Group or user name section, in case you don’t see the everyone option, then you simply need to click on add and type everyone.
-
The next step is to save changes and click on ok and select full control.
-
Toward the end, click on apply and ok tabs respectively and check if you can host the company file in multi user mode.
Method 2: Set the required permissions on windows to host the company file
In case your company file lacks the permissions on the windows OS, then you can end up in such an error. To set the permissions, here are the steps that can be followed:
-
The very first step is to head to the file manager and move to the folder where the company file is saved.
-
Right click the folder and choose the properties tab.
-
You will have to click on the option that says sharing and then click on share add
-
After that, choose QBDataServiceUserXX service for your version of QuickBooks and give full control access to both users.
-
The last step is to click on share to conclude the process.
Method 3: Make changes to the windows host file
Windows host file has the info network configuration that can simply indicate location of the server and workstations connected to each other in the network. You can try performing the below steps to make changes to the windows host file. Let us have a look:
-
Start by pressing windows + R and enter CMD and click on enter tab.
-
You now have to enter the ipconfig and click on enter tab
-
Also, note the name of the IP address and the host name in the notepad.
-
You will get the same info from all the workstations connected to the network
-
Exit QuickBooks, in case it is running on the system and move to the following folders to find the host file:
-
C:\Windows\System32\Drivers\Etc
-
C:\Windows\Syswow64\Drivers\Etc
-
The user needs to then open the host file and choose notepad, in case asked to choose an application.
-
After that, add the IP address along with the system name in the file and you must use the tab to enter any spaces.
-
Ensure that the server system has the info of the workstation and every workstation must have the required info of the server system.
-
This includes the IP address and system name
-
Hit ctrl + Skeys to save changes
-
Rename the host file by adding old and save the new file as hosts in the folder.
YouC:\Windows\System32\Drivers\EtcC:\Windows\Syswow64\Drivers\Etc
Conclusion!
Getting rid of error code H202 in QuickBooks isn’t a tough nut to crack. Implementing the measures above can help in eliminating the issue successfully. However, make sure to address the error as soon as possible, as it might hamper your crucial company file data.
Also Read: QuickBooks Desktop 2023 – Pricing, Features and Download


Comments
0 comment